Amazon S3
Amazon S3, or Amazon Simple Storage Service, is a scalable cloud storage service provided by Amazon Web Services (AWS). It is used for a variety of purposes, including data backup, data archiving, content distribution, website hosting, and application data storage. You can set up Wallarm to send files with the information about detected hits to your Amazon S3 bucket. Information will be sent in JSON files every 10 minutes.
Data fields for each hit:
-
time- date and time of hit detection in the Unix Timestamp format -
request_id -
ip- attacker's IP -
Hit source type:
datacenter,tor,remote_country -
application_id -
domain -
method -
uri -
protocol -
status_code -
attack_type -
block_status -
payload -
point -
tags
Files will be saved to your S3 bucket using the naming convention wallarm_hits_{timestamp}.json or wallarm_hits_{timestamp}.jsonl. The format, either JSON Array or New Line Delimited JSON (NDJSON), will depend on your choice during integration setup.
Setting up integration
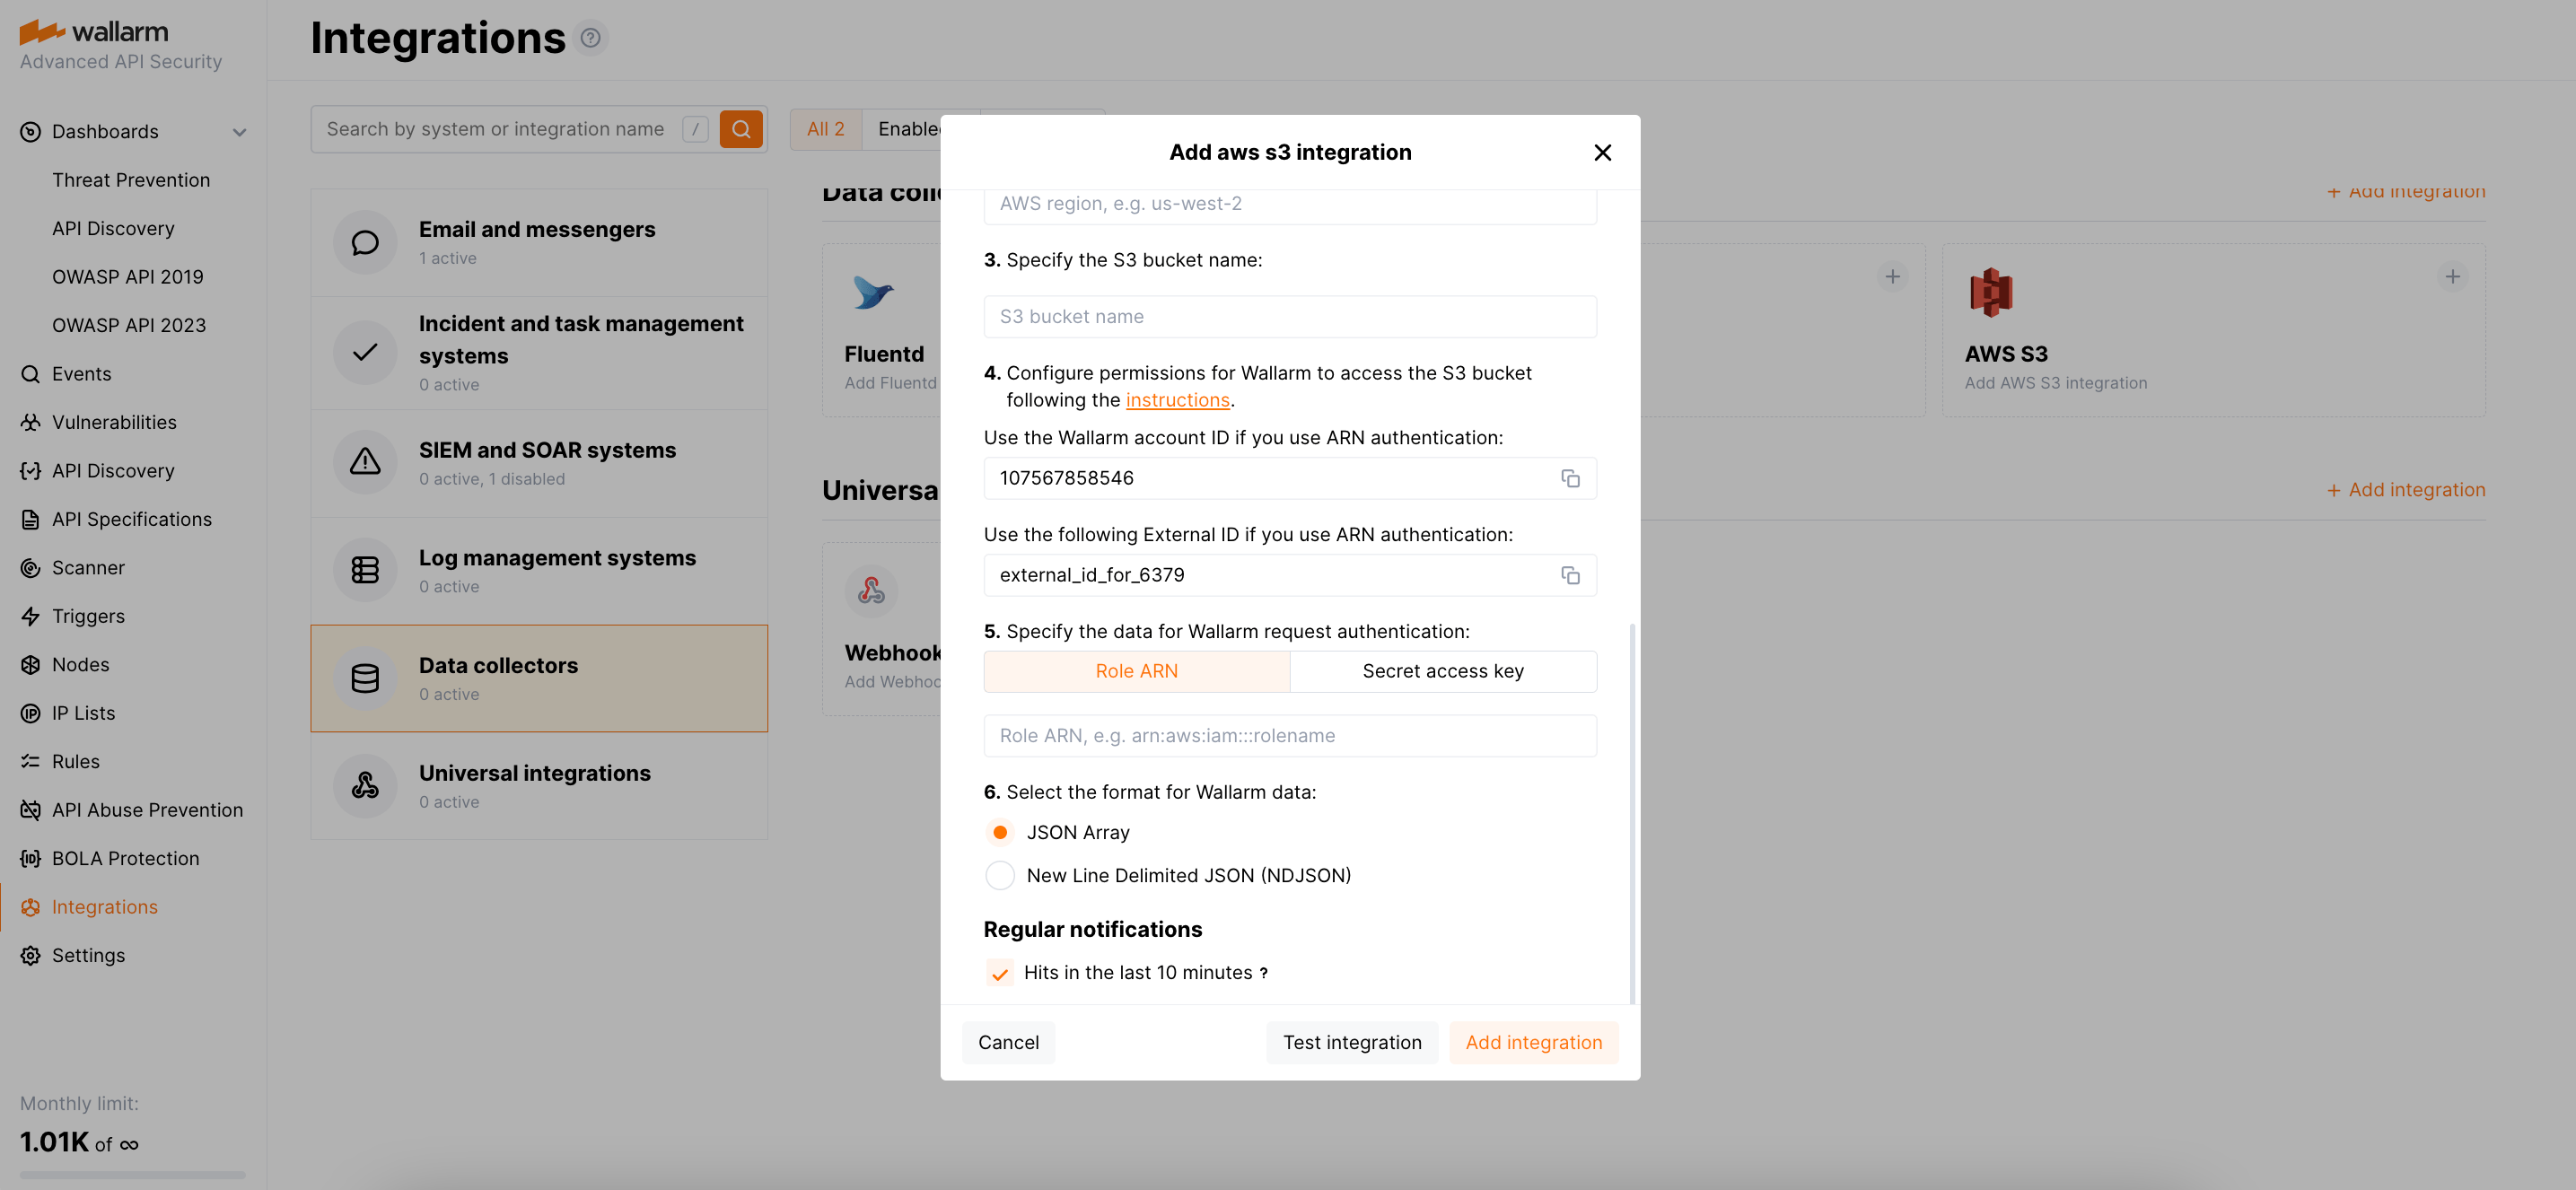
When setting up the integration with Amazon S3, you need to decide which method of authorization you will use:
-
Via role ARN (recommended) - using roles with external ID option to grant access to resources is recommended by AWS as a method that increases security and prevents "confused deputy" attacks. Wallarm provides such ID unique for your organization account.
-
Via secret access key - more common, simpler method, requiring shared access key of your AWS IAM user. If you select this method, it is recommended to use the access key of a separate IAM user that has write-only permission to the S3 bucket used in the integration.
To set up an Amazon S3 integration:
-
Create an Amazon S3 bucket for Wallarm following the instructions.
-
Perform different steps depending on selected authorization method.
-
In AWS UI, navigate to S3 → your bucket → Properties tab and copy the code of your bucket's AWS Region and Amazon Resource Name (ARN).
For example,
us-west-1as a region andarn:aws:s3:::test-bucket-jsonas ARN. -
In the Wallarm Console UI, open the Integrations section.
- Click the AWS S3 block or click the Add integration button and choose AWS S3.
- Enter an integration name.
- Enter the previously copied AWS region code of your S3 bucket.
- Enter your S3 bucket name.
- Copy the provided Wallarm account ID.
- Copy the provided external ID.
- In AWS UI, initiate creation new role under IAM → Access Management → Roles.
- Select AWS account → Another AWS Account as trusted entity type.
- Paste Wallarm Account ID.
- Select Require external ID and paste external ID provided by Wallarm.
-
Click Next and create a policy for your role:
-
Complete role creation and copy role's ARN.
-
In the Wallarm Console UI, your integration creation dialog, at the Role ARN tab, paste your role's ARN.
- In AWS UI, navigate to S3 → your bucket → Properties tab and copy the code of your bucket's AWS Region, for example
us-west-1. - Navigate to IAM → Dashboard → Manage access keys → Access keys section.
- Get ID of access key that you store somewhere or create new/restore lost key as described here. Anyway, you will need your active key and its ID.
- In the Wallarm Console UI, open the Integrations section.
- Click the AWS S3 block or click the Add integration button and choose AWS S3.
- Enter an integration name.
- Enter the previously copied AWS region code of your S3 bucket.
- Enter your S3 bucket name.
- At the Secret access key tab, enter access key ID and the key itself.
-
-
Select the format for Wallarm data: either a JSON Array or a New Line Delimited JSON (NDJSON).
-
Make sure in the Regular notifications section, hits in the last 10 minutes are selected to be sent. If not chosen, data will not be sent to S3 bucket.
-
Click Test integration to check configuration correctness, availability of the target system, and the notification format.
For Amazon S3, integration test sends the JSON file with data into your bucket. Here is an example of the JSON file with the data on hits detected in the last 10 minutes:
[ { "time":"1687241470", "request_id":"d2a900a6efac7a7c893a00903205071a", "ip":"127.0.0.1", "datacenter":"unknown", "tor":"none", "remote_country":null, "application_id":[ -1 ], "domain":"localhost", "method":"GET", "uri":"/etc/passwd", "protocol":"none", "status_code":499, "attack_type":"ptrav", "block_status":"monitored", "payload":[ "/etc/passwd" ], "point":[ "uri" ], "tags":{ "lom_id":7, "libproton_version":"4.4.11", "brute_counter":"c188cd2baa2cefb3f3688cb4008a649e", "wallarm_mode":"monitoring", "final_wallarm_mode":"monitoring" } }, { "time":"1687241475", "request_id":"b457fccec9c66cdb07eab7228b34eca6", "ip":"127.0.0.1", "datacenter":"unknown", "tor":"none", "remote_country":null, "application_id":[ -1 ], "domain":"localhost", "method":"GET", "uri":"/etc/passwd", "protocol":"none", "status_code":499, "attack_type":"ptrav", "block_status":"monitored", "payload":[ "/etc/passwd" ], "point":[ "uri" ], "tags":{ "lom_id":7, "libproton_version":"4.4.11", "brute_counter":"c188cd2baa2cefb3f3688cb4008a649e", "wallarm_mode":"monitoring", "final_wallarm_mode":"monitoring" } } ]{"time":"1687241470","request_id":"d2a900a6efac7a7c893a00903205071a","ip":"127.0.0.1","datacenter":"unknown","tor":"none","remote_country":null,"application_id":[-1],"domain":"localhost","method":"GET","uri":"/etc/passwd","protocol":"none","status_code":499,"attack_type":"ptrav","block_status":"monitored","payload":["/etc/passwd"],"point":["uri"],"tags":{"lom_id":7,"libproton_version":"4.4.11","brute_counter":"c188cd2baa2cefb3f3688cb4008a649e","wallarm_mode":"monitoring","final_wallarm_mode":"monitoring"}} {"time":"1687241475","request_id":"b457fccec9c66cdb07eab7228b34eca6","ip":"127.0.0.1","datacenter":"unknown","tor":"none","remote_country":null,"application_id":[-1],"domain":"localhost","method":"GET","uri":"/etc/passwd","protocol":"none","status_code":499,"attack_type":"ptrav","block_status":"monitored","payload":["/etc/passwd"],"point":["uri"],"tags":{"lom_id":7,"libproton_version":"4.4.11","brute_counter":"c188cd2baa2cefb3f3688cb4008a649e","wallarm_mode":"monitoring","final_wallarm_mode":"monitoring"}} -
Click Add integration.
Wallarm Cloud IP addresses
To provide Wallarm Cloud access to your system, you may need a list of its public IP addresses:
To control the amount of stored data, it is recommended to set up an automatic deletion of old objects from your Amazon S3 bucket as described here.
Disabling and deleting an integration
You can delete or temporarily disable the integration. While deleting stops sending notifications and completely deletes all configuration, disabling just stops sending notifications, which you can re-enable at any moment with the same settings.
If the System related events are selected to trigger notifications for the integration, Wallarm will notify you about both of these actions.
System unavailability and incorrect integration parameters
Notifications to the system are sent via requests. If the system is unavailable or integration parameters are configured incorrectly, the error code is returned in the response to the request.
If the system responds to the Wallarm request with any code other than 2xx, Wallarm resends the request at intervals until the 2xx code is received:
-
The first cycle intervals: 1, 3, 5, 10, 10 seconds
-
The second cycle intervals: 0, 1, 3, 5, 30 seconds
-
The third cycle intervals: 1, 1, 3, 5, 10, 30 minutes
If the percentage of unsuccessful requests reaches 60% in 12 hours, the integration is automatically disabled. If you receive system notifications, you will get a message about the automatically disabled integration.